1780s round gown, A nod to Deborah Sampson Gannett

After making my silk italian gown https://sewthroughtime.home.blog/2019/05/10/belles-italian-gown-construction/ I really wanted one out of cotton or linen to have an easily washable version for frolicking about with kids and for picnics and such were spills and other little accidents can happen. Sure I have my cotton caraco but I was never really happy with it eventually I did discover why, the style I had been after when I first desided to make 18th century garments was the polonaise not a caraco but more about that later… Anyways after making my daughters gown https://sewthroughtime.home.blog/2019/07/03/young-girls-18th-century-gown/ I had quite a bit of the duvet left eventhough I had bought the smallest one so I wanted to use that up. I am a firm believer on using as little resourses as possible for extra things like costuming, I don’t want myt hobby to have a huge negative impact on the environment. So when I buy something new I try to use it all and only buy things from sustainable sourses when ever I can.

Going through extants I completely fell in love with this one and how similar it seems to the ikea duvet. Sure the flowers and arrangement is different but the overall feel reminds me of it.

After reading the story behind the dress I just had to make it and luckily it was a round gown so I thought I could just eek one out of the leftovers making my costuming also more eco friendly with using up all the material I buy. If you don’t know Deborah’s story I highly recommend you read about it. She was an extraordinary woman who dressed as a young man to be able to serve in the continental army in the American revolutionary war.

I figured since I already had a pattern fitted to my measurements making this would be so easy and straight forward that I could do it easily in a weekend. Well yes kinda it could have… but wasn’t. 😀 Is it ever? First of all the back needed to be refitted to the side. I thought I must have just made a mistake drawing the back into 4 pieces for this one instead of the 2 my previous dress had. That really should have been my first clue that there is something wrong here. Well then my second mistake came from fitting this over my old stays that were of an earlyer siluette and weren’t well fitting on me. I was making new stays at the same time but I figured I can finish the gown and then sew the stay pieces together. The third was that I pleated the skirts half way around the bodice for the back and pleated the rest onto a linen tape that then ties at my waist before pinning the gown on leaving pocket slits at the side and the front bodice to dip lower than the skirts. Sure the basic idea is good, it’s how many extant round gowns are made but with the shape of my bodice the sides come slight higher than my narrowest part atleast in these new well fitting stays so there is gap at the sides. The problems that came with fitting the gown over the old stays were that these new ones being 80s stays already have some forward thrust at the chest when the previous ones were straight. That ofcourse means that my gown is very tight in the chest and very hard to pin on. The other problem came when I tried those new stays on. Somewere between measuring myself for the stays and making them I had lost weight, 2 inches off my waist! 2 inches completely changes the fit of things. Well I got the stays salvaged luckily but ofcourse this meant my round gown is now also too big in the waist, so I’m left with hardly any overlap at the top and with a huge overlap at the bottom so at this point I realized that that first mistake I thought I made in drawing the pattern wasn’t actually a mistake but a clue that something had happened to my body. So for that first picnic I wore stays that were missing the binding and my gown was not only pinned in the front like normally but also pinned at the sides to keep the front up so that the waist tape and my stays wouldn’t show.

I made this hat specifically for this picnic, I’ll post about it soon 🙂

I did like the gown though so I ripped the front part of the skirt off the waist tape and sew up those side seams completely and after studying some extant gown pictures I made new pockets slits by cutting the fabric further forward just at the line were the bodice dips for the front then hemmed the slits and pleated the new back pieces into the bodice and sewed them on. Then the front got repleated and sewn onto a new tape as the old ones got destroyed when ripping it out.

the taking it apart bit was not fun at all my tape had a fairly loose weave to it like many modern cotton tapes do and it just kept on braking

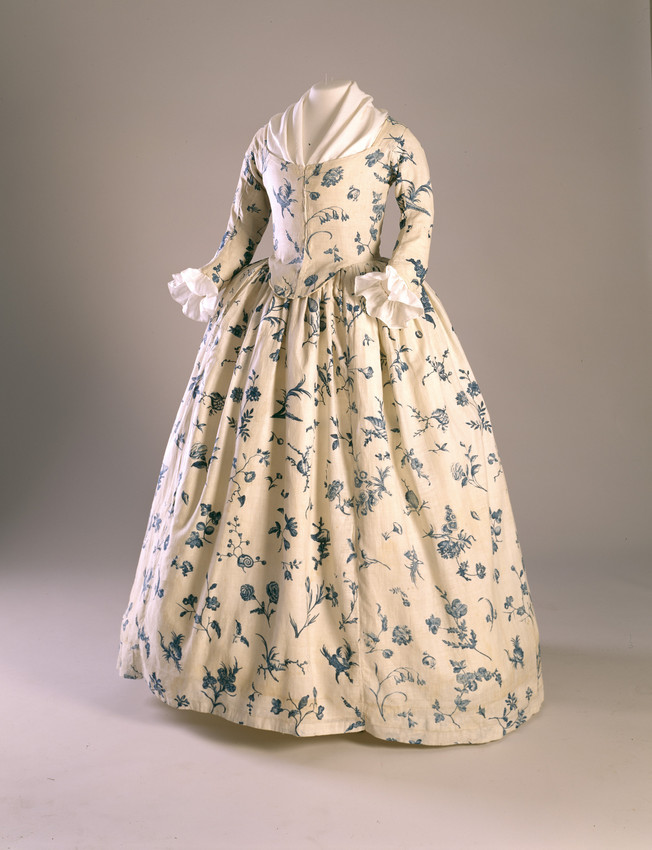
To make my life easier I just left the front as is with it’s problems and just put lacing strips on the inside so that I can pull the gown into shape and just pin it to smooth the edges. With the gown finished I wanted to add the sleeve ruffles as the picture of the original has. I used the american duchess guide book for the construction just made them wider.

This time my interier of the gown looks much better than on the italian gown, sure it’s rough but only the historical accurate roughness no goofups on my part.

The gown is lined in a lightweight shirt linen and a very thin linen table cloth at the shoulders for added durability to keep the dress a really light summer dress for hot days. It is constructed using the american duchess book instructions for the italian gown with the added front bit to make it a round gown and the lacing strips.

The gown is hemmed even so that it can be worn without any rump or with the small rump from the patterns of fashion 5 that I posted about in my previous post. It gives a nice lift and that 80s junk in the trunk siluette but without the added pasteboard it really doesn’t require any extra hem length.

Now with all the fixes I wore it again this past weekend to a living history event at a apothecary museum and gentry home were we performed a few dances and brought the past to life for the guests. I have to admit the front bugged me a bit but I still haven’t made up my mind as to fix it or not. I think I’ll leave it as is for now since summer is almost at an end anyways and see what the situation is next summer. Since I didn’t do anything to make the weight loss happen who knows what weight or size I’ll be next year.

with the rump, my shoes are true edwardian and with the luis heel make a decent stand in for late 18th century pumps
and here is the side profile without the rump just my natural junk lol

I’ll hopefully go out tomorrow to trake some stylized pictures with the hat and then post about it and my cap more. For now here are some pictures from the picnic and the museum for you to enjoy.

till next time! xxx

my hair is padded with an early 1780s type of padding made from the american duchess beauty guide book

1780s Belle

Now Finally had time to get some real Disney Princess Belle pictures! I’m so happy with how this entire look came together. You can read about the idea more here https://sewthroughtime.home.blog/2019/04/08/historically-accurate-disney-princess-belle-the-idea/

The outfit consists of a italian gown and a quilted petticoat with a embroidered pocket. If you haven’t already read about my making them they can be found here https://sewthroughtime.home.blog/2019/04/13/quilted-petticoat/ and here https://sewthroughtime.home.blog/2019/04/26/tale-as-old-as-time-pockets/ Ofcourse I am also wearing a shift (the undies of the 18th century), stays (18th century version of a corset to get the conical shape) and split rump to get that big butt action of the late 18th century, these are all from a previous project from before I started blogging.

I made this outfit for an 18th century masquarade ball this spring and there I did my hair in a more historically accurate style rather than going full on disney Belle.

Then this week when all the spring flowers bloomed we went to take some pictures in true Disney princess style with my hair done up more accurate to the movie look.

And now on to the picture galore! If you look closely at my gown skirts you can notice I’ve tied them in several different ways for the pictures, each giving a slighty different effect.

this pleating is really my favorite part of tghe italian gown
the quintessential princess twirl

And one last one with hubby, more about his outfit later. Now I’m off to making the kids some 18th century garments for a picnic coming up soon… 🙂

Belle’s italian gown construction

Ever since I started down the 18th century costuming rabbit hole I’ve loved the italian gown, the fitted back that ends in that deep v with a slip rump to give your derriere that extra oomph. The reason why I decided to make Belle’s gown an italian gown instead of the sack back that would be from the 1740s when the book first came out was that fitted back and flowing skirt. As much as I’ve loved the francaise gown Belle costumes I’ve seen others make it lacks that one thing why I think the animators originally went with a 19th century ball gown instead of 18th century, that princess skirt twirl! You know the one every little child does as soon as they get that princess dress on. A francaise moves beautifully but those loose back pleats just do not twirl the same.

here is the francaise from Belle’s time
and here is the fitted back of an italian gown

I started mine by printing out the italian gown pattern in the American duchess guide to the 18th century dressmaking https://www.american-duchess.com/book/american-duchess-guide I scaled the pattern as near as I could to what I thought would be my measurements and printed it, then taped the pieces together to form a pattern and traced it onto pattern paper and muslin to make my mock up. American duchess blogged about scaling these patterns up to make a printable sheet and since her way seems much more accurate than mine I’ll just link that instead of explaining how I did it. http://blog.americanduchess.com/2019/04/how-to-scale-up-gridded-sewing-patterns.html

First mock up was slightly loose but otherwise ok
I sewed the mock up quick and dirty on the machine, marked any nececary changes on it and ripped it open and used that as my pattern pieces and as my lining on my gown

cutting into silk is very terrifying

All the sewing I did by hand with silk thread using the instructions in the american duchess guide. All in all I’m happy with it but in the armpit area my stitches on the inside are pretty messy. Also I’m not sure how but somehow I goofed and managed to make the lining too small on the other arm so there is tiny bit of silk peeking out on the inside.

first try prooved that I had somehow managed to miscalculate and ended up making the back pieces too big. Here I have to give huge credit to hubby who patiently pinned this all in place for me despite his complete lack of interest in sewing
since the front didn’t need any fussing with I finished it off with a running stitch
Here is the side back seam with the lining sewed on to the front pieces
One last check before cutting the lining and sewing the fashion fabric on top
the fashion fabric gets sewn on top of the side back seam in a curve to give an illusion of a smaller waist

fitting with the back side seams sewn up
the front is still a bit floppy in this one but here I’m setting the sleeve, the front is smoothed out against the shoulder strap so that the extra volume that allows your arm to move gathers in the back
here you can see how the fabric gathers in the back of the arm to give full range of movement
the sleeve is first rather crudely sewn onto the shoulder strap lining
then the fashion fabric is pinned onto the shoulderstrap hiding all that messy stitching
I prick stitched the long sides and aplique stitched the short edges of the shoulder strap to the gown
Here is that messy inside bit at the armpit. I’m not too worried about it though because slightly messy is completely authentic though I think mine is a bit more than usual

Next came the pleating of the skirt part. I decided to leave the edges unturned as the selvedge gave a nice firm edge to it so I just sewed the skirt pieces together and started pleating. I used the stripes in my fabric as a rough guide and pleated it so that 2 pleats made up the width of one stripe. So always one opposide colored stripe ended up completely hidden, luckily this added up to pretty much the width I needed.

here the fabric is all pleated and pinned to correct size
in this one you can kind of see the color changes in the pleats, this proved near impossible to photgraph with the silk shining and the srtipes being so similar in color
gown pinned ontop of the skirt
I applique stitched the bodice to the skirt
after attaching the bodice to the skirt I ripped open the top and folded it down leaving the extra fabric to give the skirt more lift
after sewing the skirt on and opening the back seam enough to let the extra fabric to fold down I stitched the back of the pleats down a little under the seam to keep the pleats from opening up too soon

After hemming the gown so that the back sweeps the floor and the sides come up to my ankles I added bias tape loops to the lower part of the skirt and ribbons to the back waist so that you can lift the skirts up in differnt ways to keep it off the ground.

dress guts! 😀

All finished! Well this post ended up so long that I’ll leave the action pictures for the next post except for thi one back view. See you then!